Insulation Removal is often necessary for upgrading your home’s energy efficiency. Old insulation can lead to pest infestations and poor air quality, which can be costly.
The best way to avoid these problems is by tackling your project with the right tools. These include a powerful insulation removal vacuum, heavy-duty bags, and protective gear like gloves, safety goggles, and dust masks. Contact Perth Insulation Remover now!
A successful Insulation Removal requires a structured approach to ensure the safety of the project participants. The process starts by sealing off the workspace and preparing the area for proper removal. Once the old insulation is removed, it should be disposed of in accordance with local environmental regulations. Then the space can be cleaned, inspected, and prepared for new insulation. The time it takes to complete the entire process can vary depending on the type of project and the size of the home. It is recommended to seek professional assistance for complex projects and older homes.
It is important to wear protective gear during the insulation removal process to minimize skin contact and inhalation of harmful fibers. This includes long sleeves, gloves, and a dust mask rated for insulation. The attic space should also be cleared of obstacles to facilitate the process. This will help reduce the risk of damaging or contaminating items in the attic and will make it easier to clean up debris. It is also important to wear appropriate clothing and shoes for the work environment.
Insulation materials can include a variety of substances, including fiberglass, cellulose, and foam. Some may contain irritants or allergens that could cause health issues if they are inhaled. Others, such as asbestos, are considered hazardous and should be handled by a licensed professional.
Before beginning the insulation removal process, it is critical to assess the attic space for potential hazards, such as water damage or mold. It is also a good idea to check for weakened areas in the attic floor or roof that could collapse under someone if stepped on. The attic space should be carefully walked over to avoid disturbing or breaking down the existing insulation.
Once the attic space has been inspected, it is time to begin the process of removing the existing insulation. Using a ladder or scaffolding, the attic space should be accessed and the existing insulation removed. It is important to take care not to disturb or break any pipes or electrical wiring in the attic as this can be dangerous and costly to repair. The insulation should be rolled or bagged for disposal, and any broken pieces should be disposed of immediately.
Preparation
Insulation removal will create a dusty mess, and it’s crucial to take the right steps before beginning. This includes covering floors, furniture and appliances with plastic sheeting and securing vents to prevent the spread of dust throughout your living spaces. A high-powered vacuum cleaner paired with a HEPA filter is also essential to avoid breathing in harmful particles. If your old insulation is comprised of fiberglass, it may contain asbestos and/or toxins and should be handled by professionals.
It’s important to shut off the power to your attic prior to the start of the project so any live wires can be safely disconnected. Working around live electrical systems can cause damage or injuries if mishandled. Additionally, if the insulation is contaminated by moisture or rodents, it will need to be completely removed and replaced.
If your attic is equipped with a hatch or ladder, you can remove some types of insulation by hand. However, many attics have a mix of different types of insulation, and some are difficult to identify without a thorough inspection. This process is usually quicker and more efficient with a professional attic inspection.
Blown and loose fill insulation must be removed with a vacuum. This can be done by either a professional or a homeowner with the proper equipment. This insulation type will need to be sucked up using an industrial-grade vacuum that has a HEPA filter. This is the only way to safely dispose of blown insulation, and it is also the most environmentally-friendly option.
If you’re replacing older insulation due to mold or rodent activity, it’s best to contact a professional contractor. They can assess the condition of your current insulation, recommend a plan of action and ensure that all materials are properly disposed of and/or recycled.
If your attic is full of blown insulation and it’s time to replace it, consider choosing injection foam insulation. It’s a non-invasive, less disruptive method of adding new insulation to your home and is designed to improve energy efficiency and reduce energy costs. This method is quick and can be completed within a day, significantly less disruptive than tearing down drywall.
Equipment
Insulation removal is a messy project that requires adherence to strict safety measures. It involves working in cramped spaces and potentially dangerous materials that can cause respiratory issues and cuts if not handled properly. In addition, removing insulation from attics can be a physically strenuous task that can result in back strain and muscle fatigue. Performing the project yourself can also be expensive, due to the costs of equipment such as a heavy-duty shop vac and large garbage bags.
Before starting the project, it is essential to identify the type of insulation you have and prepare for its removal. This includes identifying the material as well as checking for any signs of damage such as mold, pest droppings, or water damage. This will help you determine if the insulation needs to be removed or if it can be salvaged.
It is recommended that you clear the attic space of stored items before beginning the insulation removal process. This will make the job easier and reduce the risk of contaminating other areas of your home with dust, mold, or other debris. It is also a good idea to wear protective gear while working in the attic, including rubber-coated gloves, a respirator rated 95 or higher, and goggles for eye protection.
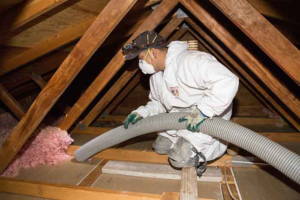
Once you have prepared the attic space, it is time to assemble your insulation removal equipment. Begin by setting up the insulation removal vacuum. Ensure that the hose is properly connected and that it is in an area that will allow the machine to reach all of the corners and crevices. Once the machine is turned on, follow the provided instructions for operating the insulation removal vacuum.
As the vacuum sucks up old insulation, it will collect in the recovery bags attached to the unit. When these bags are full, they should be disconnected from the vacuum and disposed of according to your local waste management regulations. Once the vacuum is empty, clean it thoroughly to remove any remaining debris. This will prevent contamination of the new insulation and prevent re-inhalation of harmful particles.
Disposal
Insulation is one of the most important features of a building, regulating temperatures and improving energy efficiency. However, over time, it can degrade due to mold, pests, and water damage. This can lead to insufficient insulation, poor air quality, and higher utility costs. It is crucial to monitor the condition of existing insulation and replace it if necessary. Insulation removal is a complex process that involves proper preparation, safety, and disposal procedures.
Before beginning the process, it is important to create a removal plan and assess the workspace for hazards. It is also vital to communicate with any team members working on the project and clarify roles. A proper plan ensures that the insulation is removed without damaging walls or structures. It also helps to reduce waste and minimize disruptions to everyday life.
Depending on the type of insulation, removal can be done manually or with a machine. The chosen method will affect the amount of time it takes to complete the project and the cost. A professional service can provide expert advice on the best removal method for each situation.
Once the insulation is removed, it is essential to clean up the area and sweep any excess dust or debris. Ideally, it should be placed in garbage bags before disposal. This can be achieved by squeezing the bag to remove any extra air, securing the end with a plastic or wire tie, and placing it in a second trash bag for added protection. The bagged insulation can then be taken to the local dump or disposed of with regular household trash.
Some types of insulation can be recycled, including fiberglass and mineral wool. These can be placed in curbside recycling containers, but other types may need to be taken to a landfill. In addition, some materials contain hazardous substances that require special handling and disposal guidelines. In these cases, working with a waste management services company is recommended to avoid environmental contamination.
While it is possible to do-it-yourself, the risks of not properly preparing or handling old insulation can be severe. This is especially true if the existing insulation is contaminated by mold, pests, or other harmful substances that can cause health problems and damage to the structure of your home. It is always a good idea to work with a professional that has the equipment and knowledge to ensure a smooth and safe insulation removal process.