Septic systems are common in rural areas, and if you’re thinking of buying a home with one, it pays to know how they work. Flushing non-biodegradable items like cigarette butts, cotton buds/swabs, and menstrual hygiene products can cause septic tanks to clog and overflow. Contact Septic Tank Armadale now!
A septic tank is an underground container where wastewater flows for basic sewage treatment. Solid waste sinks to the bottom of the tank, while oil and grease float to the top as scum.
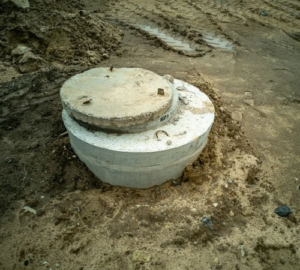
Septic tanks are essential to anyone who lives in a house that isn’t connected to the municipal sewer line. These underground sedimentation tanks use natural processes & proven technology to treat wastewater from household plumbing. They are designed to collect the waste from your toilets, kitchen drains, and washing machine and then hold the liquids until they can be absorbed by the soil. The solids will sink to the bottom of your septic tank and the liquid waste (known as effluent) will exit into a buried drainage field. This is a very simple and effective way of treating wastewater without any harmful pollutants being discharged into the environment.
Your septic tank works by separating the wastewater into three different layers. The scum layer rises to the top and contains any fats, oils, and greases. The middle layer is the wastewater, and the bottom is the sludge. Microorganisms living in your septic tank will break down the organic materials to produce mostly water and some carbon dioxide. These microorganisms will also keep the sludge from floating to the surface in the wastewater. This prevents the solids from entering your absorption field, which could clog the leach lines and diminish the soil porosity.
Once the wastewater leaves your septic tank it will enter an absorption field that is made of gravel trenches filled with holes underneath the ground. The wastewater will filter into the ground and then be absorbed by the soil and grass above. This is a very natural process and it is the best way to treat your waste without any harmful chemicals being discharged into the environment.
A few types of septic systems are available, including two-stage systems like the Imhoff tank and drip distribution systems. Some tanks are designed with siphons that boost the volume and velocity of wastewater flow to and from the absorption field. This helps prevent premature clogging of the drainage field and extends its life.
If you are planning on buying a home with an existing septic system or are considering building a new one, it’s important to know how your septic tank functions so that you can avoid any problems and ensure your system is working properly. Local governments may have regulations regarding septic tank inspections and pumping. It’s a good idea to have a professional inspect your septic tank at least once every year.
Septic Tank Inspections
Your home has a lot going on underground, from flushing toilets to washing dishes and laundry. All this water and waste disappears for you, thanks to the magic of your septic system. But how do you know if it’s working properly? That’s what septic tank inspections are for.
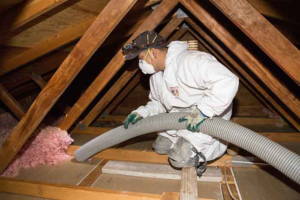
A septic tank inspector will go to the septic system, dig up and uncover the lid, and probe its condition. The inspector will also examine the septic tank riser pipes and baffles for signs of cracking or settlement. They’ll check to see if the tank is big enough for your family’s occupancy based on the number of people per household and will perform a hydraulic load test on the absorption field to determine whether it can handle the anticipated wastewater flow.
Once the septic tank is uncovered, the inspector will check the level of sludge in it. This will indicate if the tank needs to be pumped. If the septic tank is full, it will take longer for sludge to separate from wastewater, which can lead to contamination of groundwater or surface water.
The inspector will then use a device called a rod to test for the presence of solids in the wastewater. This will indicate if the septic tank needs to be pumped or if there are cracks in the shell that would allow contaminants to enter the absorption field.
Once the tank is inspected, the inspector will bury the lids and cover the site with sod. Some inspectors will even re-seed the area to help the grass recover. Home buyers should always have a septic tank inspection done before closing on a home. A septic system is expensive to replace, so it’s better to pay for an inspection up front and avoid costly surprises down the road. Routine septic inspections are a smart investment that can protect the health and value of your property for years to come.
Septic Tank Pumping
Septic tanks need to be pumped regularly to prevent buildups of solid waste. This process involves locating the tank, and using specialized equipment to remove the waste. Keeping up with septic tank pumping reduces sewage backups in your home and protects the environment as well. If your septic tank gets full, it can overflow, contaminating the soil and water with dangerous bacteria and pathogens. It can also emit foul odors, creating an unpleasant environment for you and your family.
To get the job done, the septic tank service provider will use a large truck with a tank and a special pump. They’ll hook a large vacuum hose to the tank, and the truck will start to pump. The sludge and scum will be removed in this way until the tank is empty. The septic tank service will then discard the waste and check for signs of damage to the septic tank or system, such as cracks or leaks.
When it’s time to have your septic tank pumped, make sure that the area around it is clear of obstructions and weeds. It will be easier for the professionals to access the tank and will help ensure that they are doing a thorough job. You should also try to remember when you last had your septic tank pumped so that you can schedule future services accordingly.
As the waste from your home drains into the septic tank, it will separate into different layers. The solids will settle at the bottom of the tank as sludge, while the liquids will move into the middle and the fats, oils and grease will float to the top. These are the three different components that make up your septic system. The more slowly-biodegradable organic solids, such as feces and toilet paper, are used up first, then the faster-biodegradable ones like kitty litter and plastic. The more these materials fill the septic tank, the faster it will need to be pumped. Septic tank pumping removes these heavier solids and allows the effluent to flow freely through your septic system.
Septic Tank Installation
A septic system is a great way to eliminate your public water bills and provide you with an efficient home sanitation system. It also offers you with a number of environmental benefits, reducing waste pollution. However, installing a septic tank requires proper planning on your part to ensure that it is installed correctly. It is best to hire professionals who have the experience and equipment for a seamless installation process. This is to ensure that the septic tank is placed properly and in compliance with health and safety regulations.
Septic tank installation requires digging a drainage pit and laying pipes to connect the septic tank to the plumbing system in your home. You will need to prepare the site by obtaining permits and marking any underground utilities. It is also a good idea to have a professional inspect your soil condition prior to starting any work.
Once the septic tank is in place, it collects and stores wastewater until it is ready for discharge. It contains a storage chamber where solid waste particles settle and float, a clarifier where liquid waste separates, and an overflow chamber to discharge the completely cleaned sewage water.
The septic tank also has a distribution box that evenly distributes wastewater to the drain field in your property. This prevents overloading one part of the absorption field and allowing for quicker breakdown of wastewater in the soil.
It is important to remember that a septic system should be emptied periodically to maintain its efficiency. This is usually done by a licensed service provider. However, you can help reduce the frequency of pumping by limiting water usage and fixing any leaks. It is also important to avoid flushing non-biodegradable waste items like cigarette butts, cotton swabs/buds, condoms, and feminine hygiene products as these can clog your septic tank.
A septic tank is a long-term investment, and it is a wise decision to make for any homeowner looking to minimize their water usage. A septic system should be considered when purchasing a home in rural areas or if you are thinking of moving to a country setting.